费用工具教程
-
In this tutorial you will learn the following concepts:
-
-
creating user interfaces programatically,
-
layouts and widgets,
-
overloading Qt classes,
-
connecting signal and slots,
-
interacting with QWidgets,
-
and building your own application.
-
The requirements:
-
-
A simple window for the application (
QMainWindow
).
-
A table to keep track of the expenses (
QTableWidget
).
-
Two input fields to add expense information (
QLineEdit
).
-
Buttons to add information to the table, plot data, clear table, and exit the application (
QPushButton
).
-
A verification step to avoid invalid data entry.
-
A chart to visualize the expense data (
QChart
) that will be embedded in a chart view (
QChartView
).
空窗口
The base structure for a
QApplication
is located inside the
if __name__ == “__main__”:
code block.
  if __name__ == "__main__":
      app = QApplication([])
      # ...
      sys.exit(app.exec_())
Now, to start the development, create an empty window called
MainWindow
. You could do that by defining a class that inherits from
QMainWindow
.
class MainWindow(QMainWindow):
    def __init__(self):
        QMainWindow.__init__(self)
        self.setWindowTitle("Tutorial")

if __name__ == "__main__":
    # Qt Application
    app = QApplication(sys.argv)
    window = MainWindow()
    window.resize(800, 600)
    window.show()
    # Execute application
    sys.exit(app.exec_())
Now that our class is defined, create an instance of it and call
show()
.
class MainWindow(QMainWindow):
    def __init__(self):
        QMainWindow.__init__(self)
        self.setWindowTitle("Tutorial")
if __name__ == "__main__":
    # Qt Application
    app = QApplication(sys.argv)
    window = MainWindow()
    window.resize(800, 600)
    window.show()

    # Execute application
    sys.exit(app.exec_())
First signal/slot connection
Exit
option must be connected to a slot that triggers the application to exit. The main idea to achieve this, is the following:
element.signal_name.connect(slot_name)
All the interface’s elements could be connected through signals to certain slots, in the case of a
QAction
,信号
triggered
可以被使用:
exit_action.triggered.connect(slot_name)
注意
Now a
slot
needs to be defined to exit the application, which can be done using
QApplication.quit()
. If we put all these concepts together you will end up with the following code:
        # Exit QAction
        exit_action = QAction("Exit", self)
        exit_action.setShortcut("Ctrl+Q")
        exit_action.triggered.connect(self.exit_app)

        self.file_menu.addAction(exit_action)
    @Slot()
    def exit_app(self, checked):
        QApplication.quit()
Notice that the decorator
@Slot()
is required for each slot you declare to properly register them. Slots are normal functions, but the main difference is that they will be invokable from
信号
of QObjects when connected.
窗口布局
Now that the main empty window is in place, you need to start adding widgets to achieve the main goal of creating an expenses application.
After declaring the example data, you can visualize it on a simple
QTableWidget
. To do so, you will add this procedure to the
Widget
构造函数。
警告
Only for the example purpose a QTableWidget will be used, but for more performance-critical applications the combination of a model and a QTableView is encouraged.
def __init__(self):
QWidget.__init__(self)
self.items = 0
# Example data
self._data = {"Water": 24.5, "Electricity": 55.1, "Rent": 850.0,
"Supermarket": 230.4, "Internet": 29.99, "Bars": 21.85,
"Public transportation": 60.0, "Coffee": 22.45, "Restaurants": 120}
# Left
self.table = QTableWidget()
self.table.setColumnCount(2)
self.table.setHorizontalHeaderLabels(["Description", "Price"])
self.table.horizontalHeader().setSectionResizeMode(QHeaderView.Stretch)
# QWidget Layout
self.layout = QHBoxLayout()
#self.table_view.setSizePolicy(size)
self.layout.addWidget(self.table)
# Set the layout to the QWidget
self.setLayout(self.layout)
# Fill example data
self.fill_table()
As you can see, the code also includes a
QHBoxLayout
that provides the container to place widgets horizontally.
Additionally, the
QTableWidget
allows for customizing it, like adding the labels for the two columns that will be used, and to
stretch
the content to use the whole
Widget
space.
The last line of code refers to
filling the table*
, and the code to perform that task is displayed below.
def fill_table(self, data=None):
data = self._data if not data else data
for desc, price in data.items():
self.table.insertRow(self.items)
self.table.setItem(self.items, 0, QTableWidgetItem(desc))
self.table.setItem(self.items, 1, QTableWidgetItem(str(price)))
self.items += 1
Having this process on a separate method is a good practice to leave the constructor more readable, and to split the main functions of the class in independent processes.
右侧布局
Because the data that is being used is just an example, you are required to include a mechanism to input items to the table, and extra buttons to clear the table’s content, and also quit the application.
To distribute these input lines and buttons, you will use a
QVBoxLayout
that allows you to place elements vertically inside a layout.
# Right
self.description = QLineEdit()
self.price = QLineEdit()
self.add = QPushButton("Add")
self.clear = QPushButton("Clear")
self.quit = QPushButton("Quit")
self.right = QVBoxLayout()
self.right.setMargin(10)
self.right.addWidget(QLabel("Description"))
self.right.addWidget(self.description)
self.right.addWidget(QLabel("Price"))
self.right.addWidget(self.price)
self.right.addWidget(self.add)
self.right.addStretch()
self.right.addWidget(self.clear)
self.right.addWidget(self.quit)
Leaving the table on the left side and these newly included widgets to the right side will be just a matter to add a layout to our main
QHBoxLayout
as you saw in the previous example:
from PySide2.QtCore import Slot
from PySide2.QtWidgets import (QAction, QApplication, QHeaderView, QHBoxLayout, QLabel, QLineEdit,
QMainWindow, QPushButton, QTableWidget, QTableWidgetItem,
QVBoxLayout, QWidget)
The next step will be connecting those new buttons to slots.
添加元素
每
QPushButton
have a signal called
clicked
, that is emitted when you click on the button. This will be more than enough for this example, but you can see other signals in the
官方文档编制
.
self.add.clicked.connect(self.add_element)
self.quit.clicked.connect(self.quit_application)
self.clear.clicked.connect(self.clear_table)
As you can see on the previous lines, we are connecting each
clicked
signal to different slots. In this example slots are normal class methods in charge of perform a determined task associated with our buttons. It is really important to decorate each method declaration with a
@Slot()
, in that way PySide2 knows internally how to register them into Qt.
def add_element(self):
des = self.description.text()
price = self.price.text()
self.table.insertRow(self.items)
self.table.setItem(self.items, 0, QTableWidgetItem(des))
self.table.setItem(self.items, 1, QTableWidgetItem(price))
self.description.setText("")
self.price.setText("")
self.items += 1
@Slot()
def quit_application(self):
QApplication.quit()
def fill_table(self, data=None):
data = self._data if not data else data
for desc, price in data.items():
self.table.insertRow(self.items)
self.table.setItem(self.items, 0, QTableWidgetItem(desc))
self.table.setItem(self.items, 1, QTableWidgetItem(str(price)))
self.items += 1
@Slot()
def clear_table(self):
self.table.setRowCount(0)
self.items = 0
Since these slots are methods, we can access the class variables, like our
QTableWidget
to interact with it.
The mechanism to add elements into the table is described as the following:
-
get the
description
and
price
from the fields,
-
insert a new empty row to the table,
-
set the values for the empty row in each column,
-
clear the input text fields,
-
include the global count of table rows.
To exit the application you can use the
quit()
method of the unique
QApplication
instance, and to clear the content of the table you can just set the table
row count
, and the internal count to zero.
验证步骤
Adding information to the table needs to be a critical action that require a verification step to avoid adding invalid information, for example, empty information.
You can use a signal from
QLineEdit
called
textChanged[str]
which will be emitted every time something inside changes, i.e.: each key stroke. Notice that this time, there is a
[str]
section on the signal, this means that the signal will also emit the value of the text that was changed, which will be really useful to verify the current content of the
QLineEdit
.
You can connect two different object’s signal to the same slot, and this will be the case for your current application:
self.description.textChanged[str].connect(self.check_disable)
self.price.textChanged[str].connect(self.check_disable)
The content of the
check_disable
slot will be really simple:
@Slot()
def check_disable(self, s):
if not self.description.text() or not self.price.text():
self.add.setEnabled(False)
else:
self.add.setEnabled(True)
You have two options, write a verification based on the current value of the string you retrieve, or manually get the whole content of both
QLineEdit
. The second is preferred in this case, so you can verify if the two inputs are not empty to enable the button
Add
.
注意
Qt also provides a special class called
QValidator
that you can use to validate any input.
空图表视图
New items can be added to the table, and the visualization is so far OK, but you can accomplish more by representing the data graphically.
First you will include an empty
QChartView
placeholder into the right side of your application.
# Chart
self.chart_view = QtCharts.QChartView()
self.chart_view.setRenderHint(QPainter.Antialiasing)
Additionally the order of how you include widgets to the right
QVBoxLayout
will also change.
self.right = QVBoxLayout()
self.right.setMargin(10)
self.right.addWidget(QLabel("Description"))
self.right.addWidget(self.description)
self.right.addWidget(QLabel("Price"))
self.right.addWidget(self.price)
self.right.addWidget(self.add)
self.right.addWidget(self.plot)
self.right.addWidget(self.chart_view)
self.right.addWidget(self.clear)
self.right.addWidget(self.quit)
Notice that before we had a line with
self.right.addStretch()
to fill up the vertical space between the
Add
和
Clear
buttons, but now, with the
QChartView
it will not be necessary.
Also, you need include a
Plot
button if you want to do it on-demand.
完整应用程序
For the final step, you will need to connect the
Plot
button to a slot that creates a chart and includes it into your
QChartView
.
# Signals and Slots
self.add.clicked.connect(self.add_element)
self.quit.clicked.connect(self.quit_application)
self.plot.clicked.connect(self.plot_data)
self.clear.clicked.connect(self.clear_table)
self.description.textChanged[str].connect(self.check_disable)
self.price.textChanged[str].connect(self.check_disable)
That is nothing new, since you already did it for the other buttons, but now take a look at how to create a chart and include it into your
QChartView
.
@Slot()
def plot_data(self):
# Get table information
series = QtCharts.QPieSeries()
for i in range(self.table.rowCount()):
text = self.table.item(i, 0).text()
number = float(self.table.item(i, 1).text())
series.append(text, number)
chart = QtCharts.QChart()
chart.addSeries(series)
chart.legend().setAlignment(Qt.AlignLeft)
self.chart_view.setChart(chart)
The following steps show how to fill a
QPieSeries
:
-
create a
QPieSeries
,
-
iterate over the table row IDs,
-
get the items at the
i
position,
-
add those values to the
series
.
Once the series has been populated with our data, you create a new
QChart
, add the series on it, and optionally set an alignment for the legend.
The final line
self.chart_view.setChart(chart)
is in charge of bringing your newly created chart to the
QChartView
.
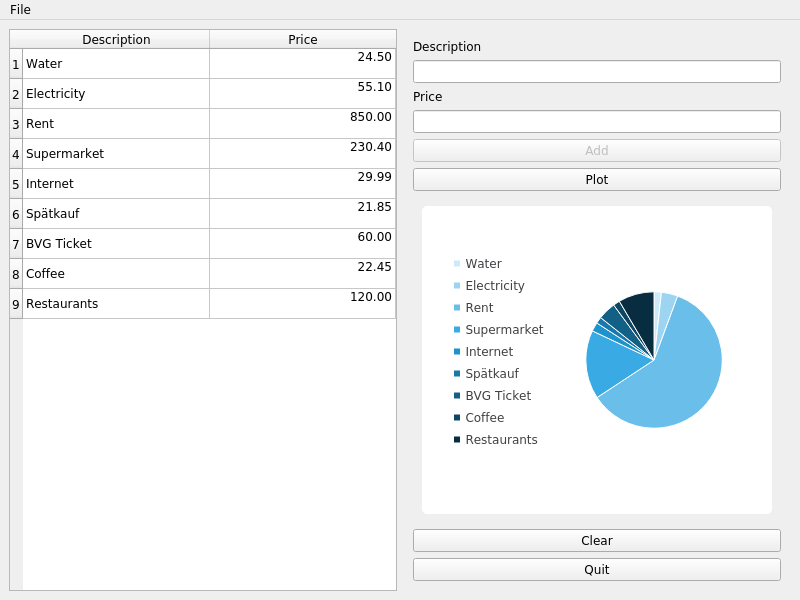
The application will look like this:
And now you can see the whole code:
#############################################################################
##
## Copyright (C) 2019 The Qt Company Ltd.
## Contact: http://www.qt.io/licensing/
##
## This file is part of the Qt for Python examples of the Qt Toolkit.
##
## $QT_BEGIN_LICENSE:BSD$
## You may use this file under the terms of the BSD license as follows:
##
## "Redistribution and use in source and binary forms, with or without
## modification, are permitted provided that the following conditions are
## met:
## * Redistributions of source code must retain the above copyright
## notice, this list of conditions and the following disclaimer.
## * Redistributions in binary form must reproduce the above copyright
## notice, this list of conditions and the following disclaimer in
## the documentation and/or other materials provided with the
## distribution.
## * Neither the name of The Qt Company Ltd nor the names of its
## contributors may be used to endorse or promote products derived
## from this software without specific prior written permission.
##
##
## THIS SOFTWARE IS PROVIDED BY THE COPYRIGHT HOLDERS AND CONTRIBUTORS
## "AS IS" AND ANY EXPRESS OR IMPLIED WARRANTIES, INCLUDING, BUT NOT
## LIMITED TO, THE IMPLIED WARRANTIES OF MERCHANTABILITY AND FITNESS FOR
## A PARTICULAR PURPOSE ARE DISCLAIMED. IN NO EVENT SHALL THE COPYRIGHT
## OWNER OR CONTRIBUTORS BE LIABLE FOR ANY DIRECT, INDIRECT, INCIDENTAL,
## SPECIAL, EXEMPLARY, OR CONSEQUENTIAL DAMAGES (INCLUDING, BUT NOT
## LIMITED TO, PROCUREMENT OF SUBSTITUTE GOODS OR SERVICES; LOSS OF USE,
## DATA, OR PROFITS; OR BUSINESS INTERRUPTION) HOWEVER CAUSED AND ON ANY
## THEORY OF LIABILITY, WHETHER IN CONTRACT, STRICT LIABILITY, OR TORT
## (INCLUDING NEGLIGENCE OR OTHERWISE) ARISING IN ANY WAY OUT OF THE USE
## OF THIS SOFTWARE, EVEN IF ADVISED OF THE POSSIBILITY OF SUCH DAMAGE."
##
## $QT_END_LICENSE$
##
#############################################################################
import sys
from PySide2.QtCore import Qt, Slot
from PySide2.QtGui import QPainter
from PySide2.QtWidgets import (QAction, QApplication, QHeaderView, QHBoxLayout, QLabel, QLineEdit,
QMainWindow, QPushButton, QTableWidget, QTableWidgetItem,
QVBoxLayout, QWidget)
from PySide2.QtCharts import QtCharts
class Widget(QWidget):
def __init__(self):
QWidget.__init__(self)
self.items = 0
# Example data
self._data = {"Water": 24.5, "Electricity": 55.1, "Rent": 850.0,
"Supermarket": 230.4, "Internet": 29.99, "Bars": 21.85,
"Public transportation": 60.0, "Coffee": 22.45, "Restaurants": 120}
# Left
self.table = QTableWidget()
self.table.setColumnCount(2)
self.table.setHorizontalHeaderLabels(["Description", "Price"])
self.table.horizontalHeader().setSectionResizeMode(QHeaderView.Stretch)
# Chart
self.chart_view = QtCharts.QChartView()
self.chart_view.setRenderHint(QPainter.Antialiasing)
# Right
self.description = QLineEdit()
self.price = QLineEdit()
self.add = QPushButton("Add")
self.clear = QPushButton("Clear")
self.quit = QPushButton("Quit")
self.plot = QPushButton("Plot")
# Disabling 'Add' button
self.add.setEnabled(False)
self.right = QVBoxLayout()
self.right.setMargin(10)
self.right.addWidget(QLabel("Description"))
self.right.addWidget(self.description)
self.right.addWidget(QLabel("Price"))
self.right.addWidget(self.price)
self.right.addWidget(self.add)
self.right.addWidget(self.plot)
self.right.addWidget(self.chart_view)
self.right.addWidget(self.clear)
self.right.addWidget(self.quit)
# QWidget Layout
self.layout = QHBoxLayout()
#self.table_view.setSizePolicy(size)
self.layout.addWidget(self.table)
self.layout.addLayout(self.right)
# Set the layout to the QWidget
self.setLayout(self.layout)
# Signals and Slots
self.add.clicked.connect(self.add_element)
self.quit.clicked.connect(self.quit_application)
self.plot.clicked.connect(self.plot_data)
self.clear.clicked.connect(self.clear_table)
self.description.textChanged[str].connect(self.check_disable)
self.price.textChanged[str].connect(self.check_disable)
# Fill example data
self.fill_table()
@Slot()
def add_element(self):
des = self.description.text()
price = self.price.text()
self.table.insertRow(self.items)
description_item = QTableWidgetItem(des)
price_item = QTableWidgetItem("{:.2f}".format(float(price)))
price_item.setTextAlignment(Qt.AlignRight)
self.table.setItem(self.items, 0, description_item)
self.table.setItem(self.items, 1, price_item)
self.description.setText("")
self.price.setText("")
self.items += 1
@Slot()
def check_disable(self, s):
if not self.description.text() or not self.price.text():
self.add.setEnabled(False)
else:
self.add.setEnabled(True)
@Slot()
def plot_data(self):
# Get table information
series = QtCharts.QPieSeries()
for i in range(self.table.rowCount()):
text = self.table.item(i, 0).text()
number = float(self.table.item(i, 1).text())
series.append(text, number)
chart = QtCharts.QChart()
chart.addSeries(series)
chart.legend().setAlignment(Qt.AlignLeft)
self.chart_view.setChart(chart)
@Slot()
def quit_application(self):
QApplication.quit()
def fill_table(self, data=None):
data = self._data if not data else data
for desc, price in data.items():
description_item = QTableWidgetItem(desc)
price_item = QTableWidgetItem("{:.2f}".format(price))
price_item.setTextAlignment(Qt.AlignRight)
self.table.insertRow(self.items)
self.table.setItem(self.items, 0, description_item)
self.table.setItem(self.items, 1, price_item)
self.items += 1
@Slot()
def clear_table(self):
self.table.setRowCount(0)
self.items = 0
class MainWindow(QMainWindow):
def __init__(self, widget):
QMainWindow.__init__(self)
self.setWindowTitle("Tutorial")
# Menu
self.menu = self.menuBar()
self.file_menu = self.menu.addMenu("File")
# Exit QAction
exit_action = QAction("Exit", self)
exit_action.setShortcut("Ctrl+Q")
exit_action.triggered.connect(self.exit_app)
self.file_menu.addAction(exit_action)
self.setCentralWidget(widget)
@Slot()
def exit_app(self, checked):
QApplication.quit()
if __name__ == "__main__":
# Qt Application
    app = QApplication(sys.argv)
    # QWidget
    widget = Widget()
    # QMainWindow using QWidget as central widget
    window = MainWindow(widget)
window.resize(800, 600)
window.show()
# Execute application
sys.exit(app.exec_())